If your a beginner guitarist, you may be asking “Do I really need an amplifier?” The answer is no, there are alternatives. One of these alternatives is, instead of buying a guitar amplifier, it is possible to connect your guitar to your PC/Mac and use a program to emulate the sound of an amplifier. There is a catch though, instead of an amplifier you have to buy an audio interface which converts the analogue guitar signal to a digital signal that can be used by your PC/Mac. Also, you will never really get satisfactory results unless you have a reasonably decent pair of audio monitors to reproduce the sound. If this isn’t possible, it can be made to work with headphones. There are a number of free options for simulating an amplifier and speakers in software but the one we’ll discuss today is AmpliTube 5 CS which is free software, with the option to try out and pay for additional features only if you want to.
This article is intended to get you up and running with AmpliTube 5 CS, there is more to the program, but I’ll leave you to discover the rest for yourself!
What interface do I need?
There are a number of audio interfaces on the market which are perfectly usable. Probably one of the more widely used is the Scarlett 2i2 manufactured by Focusrite, currently on its fourth generation. There is also the Scarlet Solo which is essentially the same device but with only one input channel. I typically recommend the Scarlet 2i2 over the Solo, the two input channels offers you more flexibility for recording. If you are limited by budget though, I would go for the Scarlet Solo.
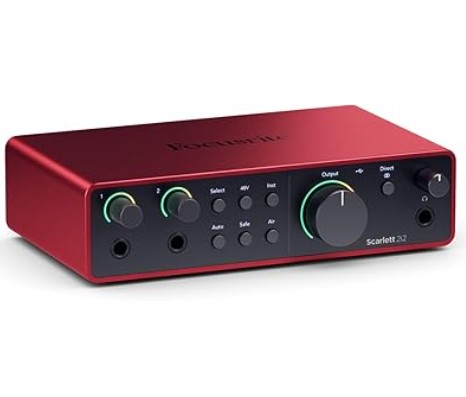
The Scarlett 2i2 features two usable channel inputs that are accessed via two separate 1/4″ jacks on the front and two XLR inputs on the rear. A guitar, bass or microphone can be connected to these inputs. The output is via USB connected to your PC or Mac.
There is a 48Vdc phantom power supply that is used to power condenser microphones if connected and a line input selector switch which is used if an audio source does not require as much pre-amplification. An example of this would be a device like a synthesiser or drum machine with a 1/4″ jack output.
The pre-amp volume adjustment is above each 1/4″ jack input and has an integral LED indicator which monitors the level of the input signal, green for ok, red for too loud.
There are also two 1/4″ mono output audio jacks for a direct connection to studio monitors if you have them.
Finally, there is separate headphone output jack with an independent volume adjustment.
The Scarlett 2i2 requires a driver to work correctly with your PC/Mac, I recommend using the official Focusrite driver otherwise you may end up with problems such as latency (a delay between you playing a note and the sound coming out the speaker) or audio breakup when playing.
I also recommend not using anything Bluetooth enabled for your audio output from the PC as this can sometimes introduce latency. Also, I’m not convinced of the Bluetooth audio quality in Windows 11 if you use that particular OS.
AmpliTube 5 CS
To emulate a the sound of an electric guitar, a program that will model a guitar amplifier and a speaker emulator is needed and there are lots available. The ones I have used and recommend are NAM Universal, Bias Fx 2 and the one we’ll be walking through in this article AmpliTube 5 CS. All these programs can be used as a standalone app or as a plugin within a DAW (Digital Audio Workstation).
AmpliTube 5 CS is a popular amp sim with five free amplifiers, six cabinets, ten stomp box effects, six rack effects, three moveable mics (typically dynamic and condenser mics) and six recording environments to try out.
How is all set up?
The following guidance assumes you have a guitar, Scarlett 2i2, PC and some output speakers or headphones. It also assumes you are using the standalone version of AmpliTube 5 CS.
Make sure the Scarlett 2i2 drivers are installed correctly following the instructions that come with the Scarlet 2i2. All the drivers are available here.
Make sure that AmpliTube 5 CS is downloaded and installed from the IK Multimedia website here.
Connect the Scarlett 2i2 to your PC using the supplied USB cable and turn all inputs down to zero and you headphone/monitor volume to about the 9 o’ clock position.
Connect your guitar to one of the input channels on the Scarlet 2i2 and slowly turn that channels input upwards whilst strumming your guitar (It is normal not to be able to hear anything at this stage). When a loud enough signal is detected the green LED should appear, keep going till it turns red and then back it off slightly. Now, strum your guitar as loudly as you would naturally play it, if it turns red, back it off incrementally some more. Repeat this until when strumming loudly it only turns green. Now your input to the PC is set up perfectly.
Please note that any time you are playing guitar and the input strays into the red, you are distorting the input signal, and this isn’t the pleasant distortion of a tube amplifier, it’s horrible sounding digital distortion. So keep an eye on your levels! Once the level is set correctly you shouldn’t have to change it.
Starting AmpliTube 5
Opening up AmpliTube 5 CS for the first time will display this screen:
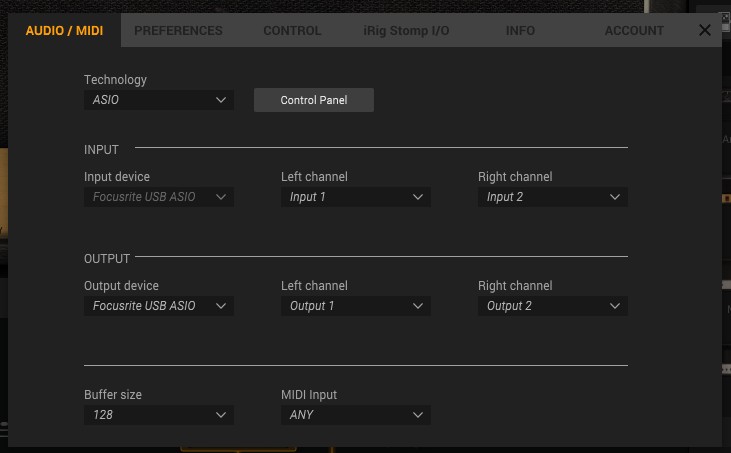
You should set Technology to ASIO and the input device to Focusrite USB ASIO as shown. The output device should be set to whatever device you want your sound to come out of, in my case I have studio monitors attached to my Scarlet 2i2 so I send the audio output back through the Scarlet 2i2 where my studio monitors are plugged in.
Pay particular attention to the buffer size, the lower you can get it the better, but start at 512 and work your way down. Reducing the buffer size improves latency but also increases the risk of popping and cracking in the sound as the PC struggles to process the audio information quickly. For my PC a buffer size of 128 produces perfect sound and no noticeable latency.
Once your done with the settings press the cross in the top right and you should see something similar to this:
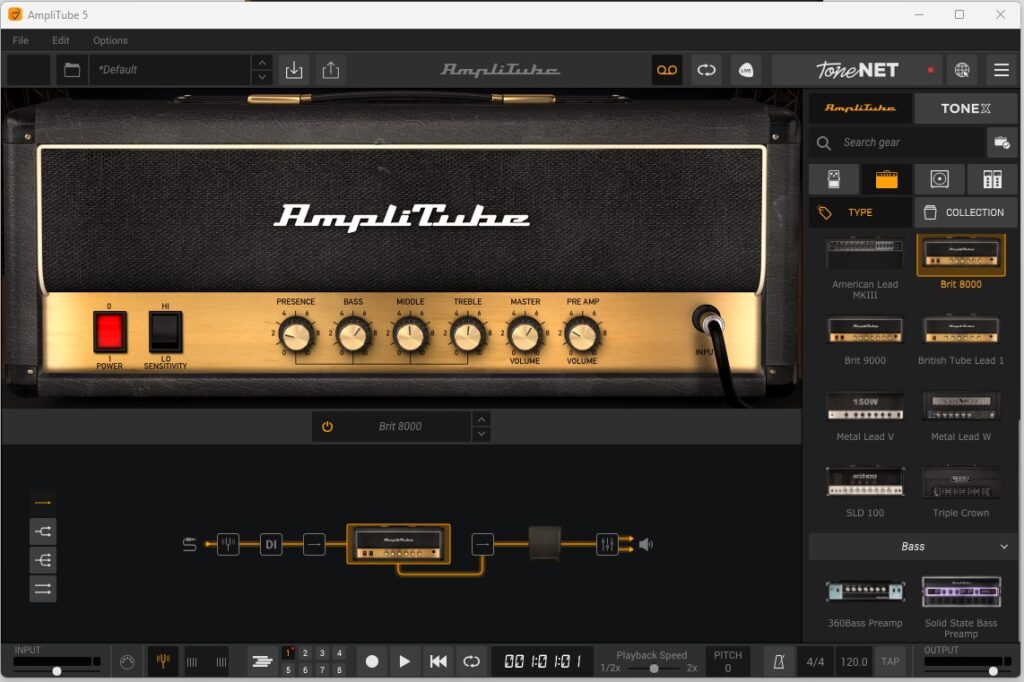
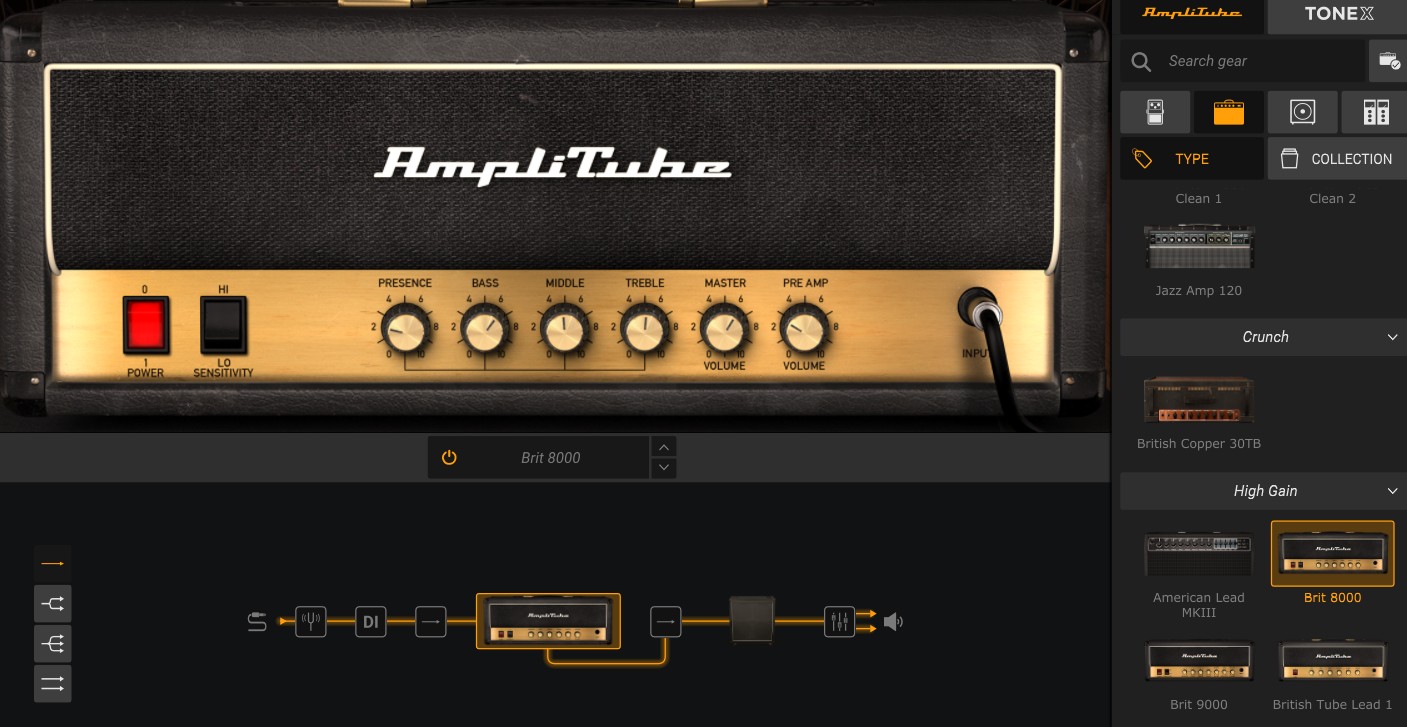
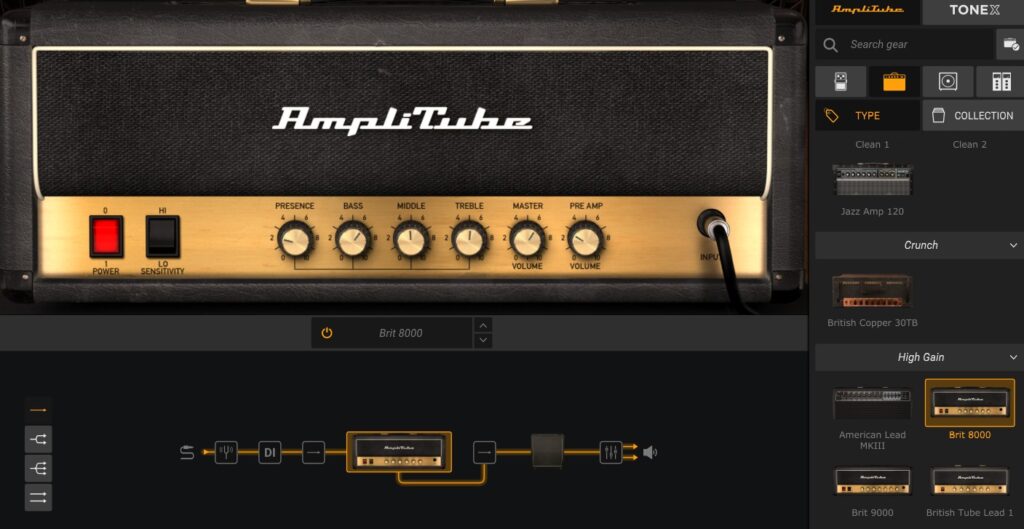
When opened for the first time, the program opens to the default pre-set which is the Brit 8000 amplifier and the 4×12 Brit Cab with no effects. Give it a strum and try it out, you should be able to hear a lightly distorted tone which would work well with a song like “Sweet Home Alabama?” Turn the monitor/headphone volume to a comfortable level on the Scarlett 2i2 and have a play. When your ready I’ll walk you through the main features of the Program.
Using AmpliTube 5
Ok, I’ll start with the box at the bottom, this represents you signal chain.

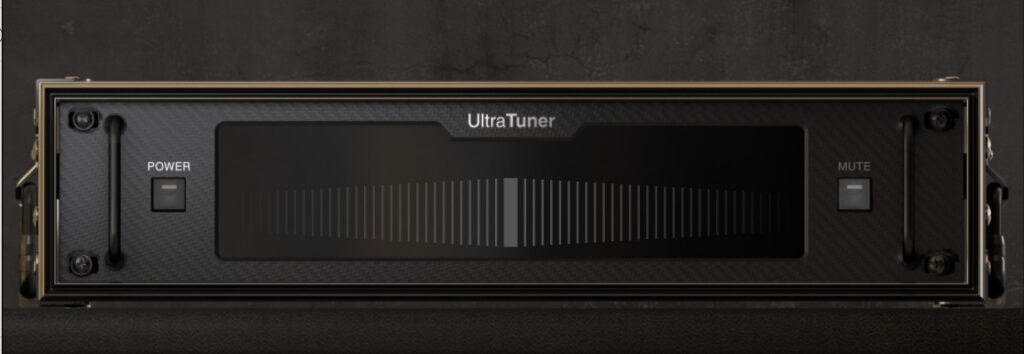
If you click on the tuning fork icon to the left, the program will open the guitar tuner feature on the window panel above the signal chain. To use it, the power button will need to be clicked to turn it on. Pluck a string and the tuner will automatically detect the note, the idea is to get the indicator as close to the middle as possible. It is a very accurate and sensitive tuner so I find getting plus or minus 3 bars from the centre is sufficient.
The next item is the Direct Input option. If this icon is clicked you will notice a blue line appear from the DI box to the final mixer at the end. All this does is mix a bit of the unmodified raw guitar signal into the final output sound, how much is decided at the mixer stage at the end. It’s not a feature I would generally use but I’m sure some people find it useful. Click on the DI box again to cancel it.
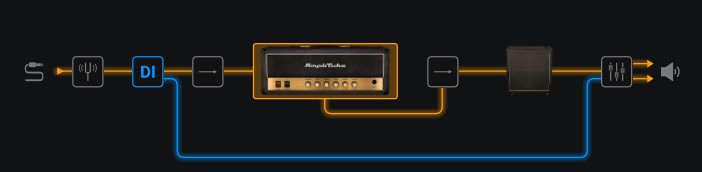
The next button cycles through some signal chain options, if you click it once, the signal chain changes to two chains in parallel. This is useful because now it is possible to mix different amps, cabs, effects and microphones in each separate chain to produce a custom sound. If you try with the default amp/cab combo on both chains you will notice the sound is a slightly thicker sounding tone. Click it again and you have the same but with three signal chains in parallel and again, using all the same amp/cabs, it sounds very slightly thicker again. Click it a third time and it selects a parallel stereo signal chain for if you have a device with a stereo output like a keyboard, this can be played though AmpliTube as well. Guitar is a mono device so it sounds exactly the same as the single chain. Click again to return to the single chain.
Another way of accessing this feature is, at the far left of the signal chain diagram are the four icon representing each type of signal chain, these can be clicked on directly to access the type of signal chain you require.

Now, if you click on the amplifier, it brings up a larger version of it in the top window frame. Here you can play with all the buttons as you would a normal amplifier, so alter the master volume, presence, EQ etc. as desired here. On the right hand frame, it displays all the amplifiers that are available. Click on another type of amplifier to swap the current amplifier out the one selected.
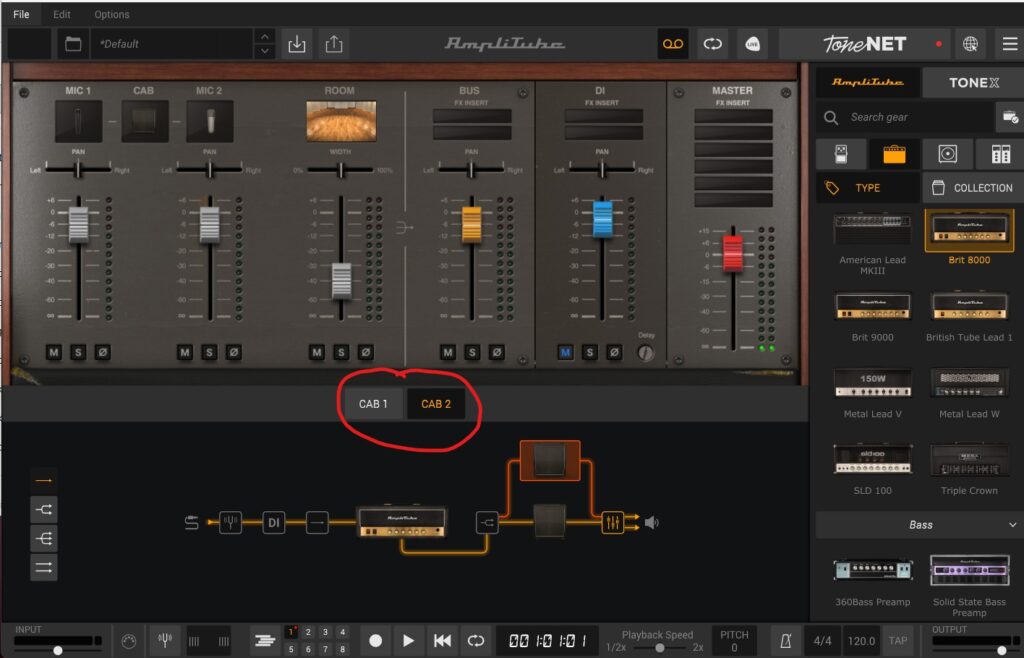
The next button along in the signal chain allows you to output your amplifier to two speaker cabs. It will default to the same cabinet as is currently selected but you can change one or both of them and blend the sounds of different cabinets for a unique sound.
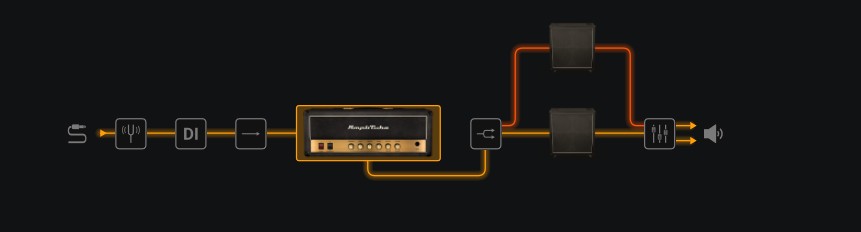
If you next click on the picture of the speaker cab, you will find a plethora of options which will lead to hour of experimentation and fine tuning. But, at its core, you can select a different speaker cabinet, different microphone positions and types and alter the mix of all these items. For the beginner it can be a bit daunting so just select a speaker cabinet and leave it at that until you become more familiar with the program and then start experimenting.
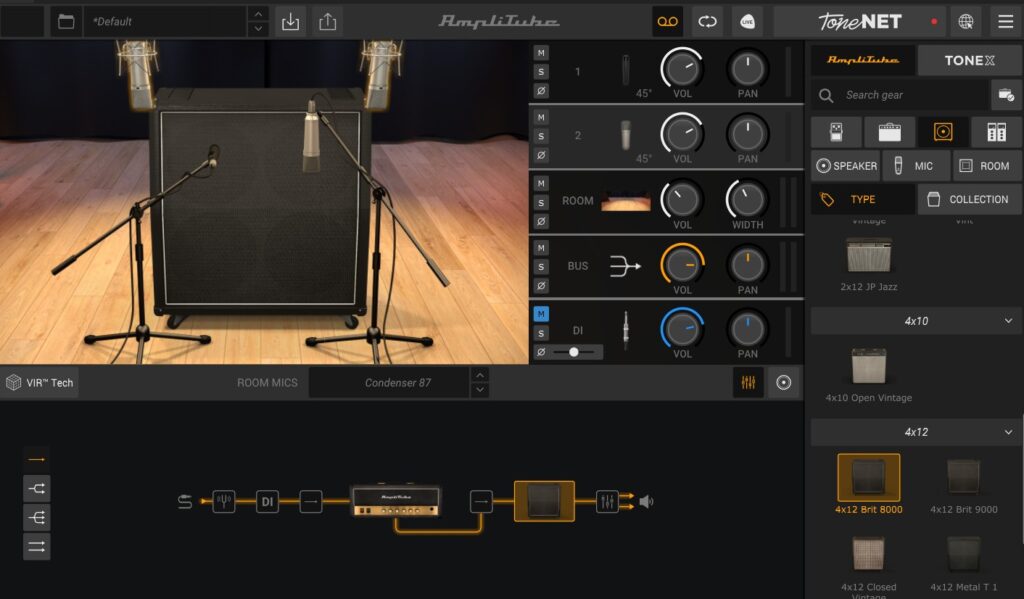
The final part of the signal chain is the mixer, here you can alter the volume and pan of all the individual elements in your signal chain. Be aware that if you have two cabinets in your signal chain there is a mixer setting for each one just below the mixing console as highlighted below.
Select each one to adjust the settings for that cabinet individually. One word of caution regarding digital distortion again, if any of the levels peak into the red i.e above 0dB, the signal is being distorted, not in a good way. Ideally, I would aim for a peak of -6dB on any of the channels for plenty of headroom.
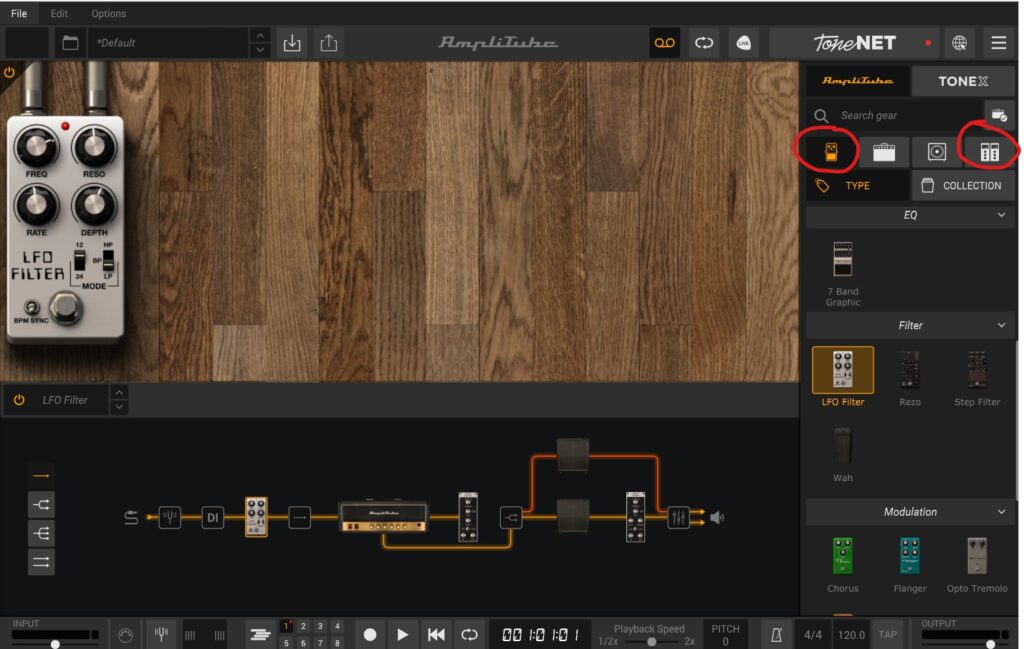
There are two different effects types in AmpliTube 5, Stomp box and rack effects. These are found by clicking on the icons highlighted below. The effects can be inserted into the effects by dragging them into the signal chain before the amplifier or after the amplifier. As a general rule, insert the stomp box effects before the amplifier and rack ones after. There’s a whole other conversation about which order effects should go in which I’ll leave for another article! If you are a beginner, I encourage you to try out each of the individual effects to get familiar with what they do.
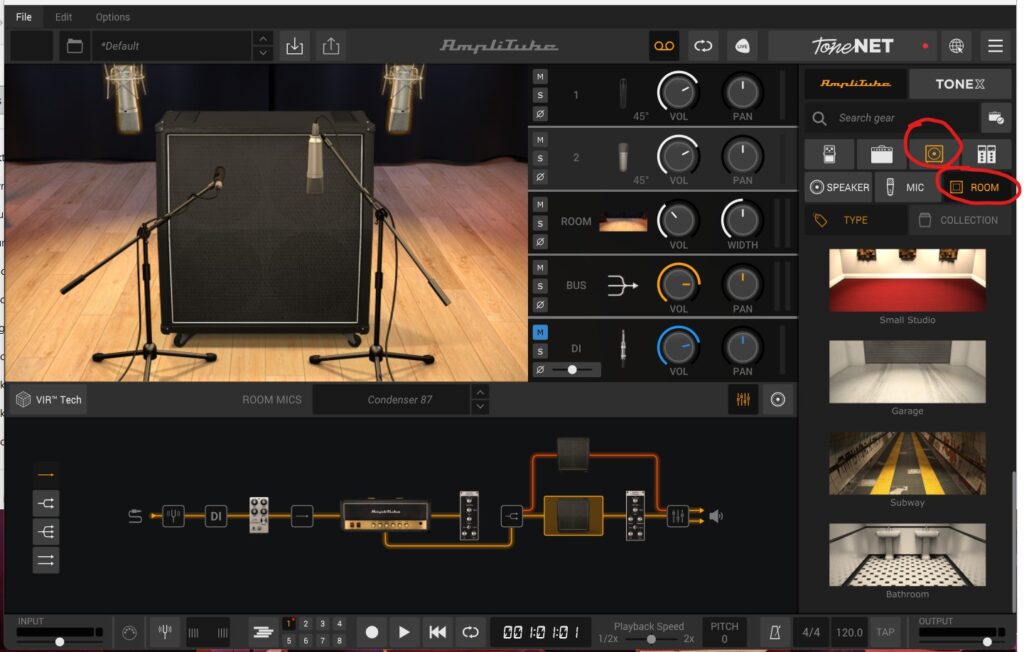
Another handy feature to know about is that the environment in which the speaker cabinets are located can be changed and this provides an opportunity to further modify the sound. To alter this click on the speaker icon and the the room icon as highlighted below. The user is then given the option of different studios, a garage, subway and bathroom environment which are fun to experiment with.
The last feature I’m going to highlight is the pre-sets. These can be accessed by the folder icon in the top left of the screen. Clicking on this shows a pre-set browser, if you click on AmpliTube 5 CS it brings up a number of pre loaded pre-sets to explore and have fun with. I find that if I am looking for a particular sound, browsing these tends to get me close and then I can tweak the signal chain to get it perfect. If you manage to make a tone that you like you can also save it as a pre-set to access later.

Final Thoughts
I hope this was helpful in getting you up and running with this excellent free program. There are a few more features on the standalone version which I haven’t mentioned such as the eight track recording facility, looper and more. I’ll leave you to discover these for yourself.
If you need a Scarlett 2i2, or Scarlet Solo, please consider buying through the link on my Recommended Kit page as it helps to support this website! thanks!