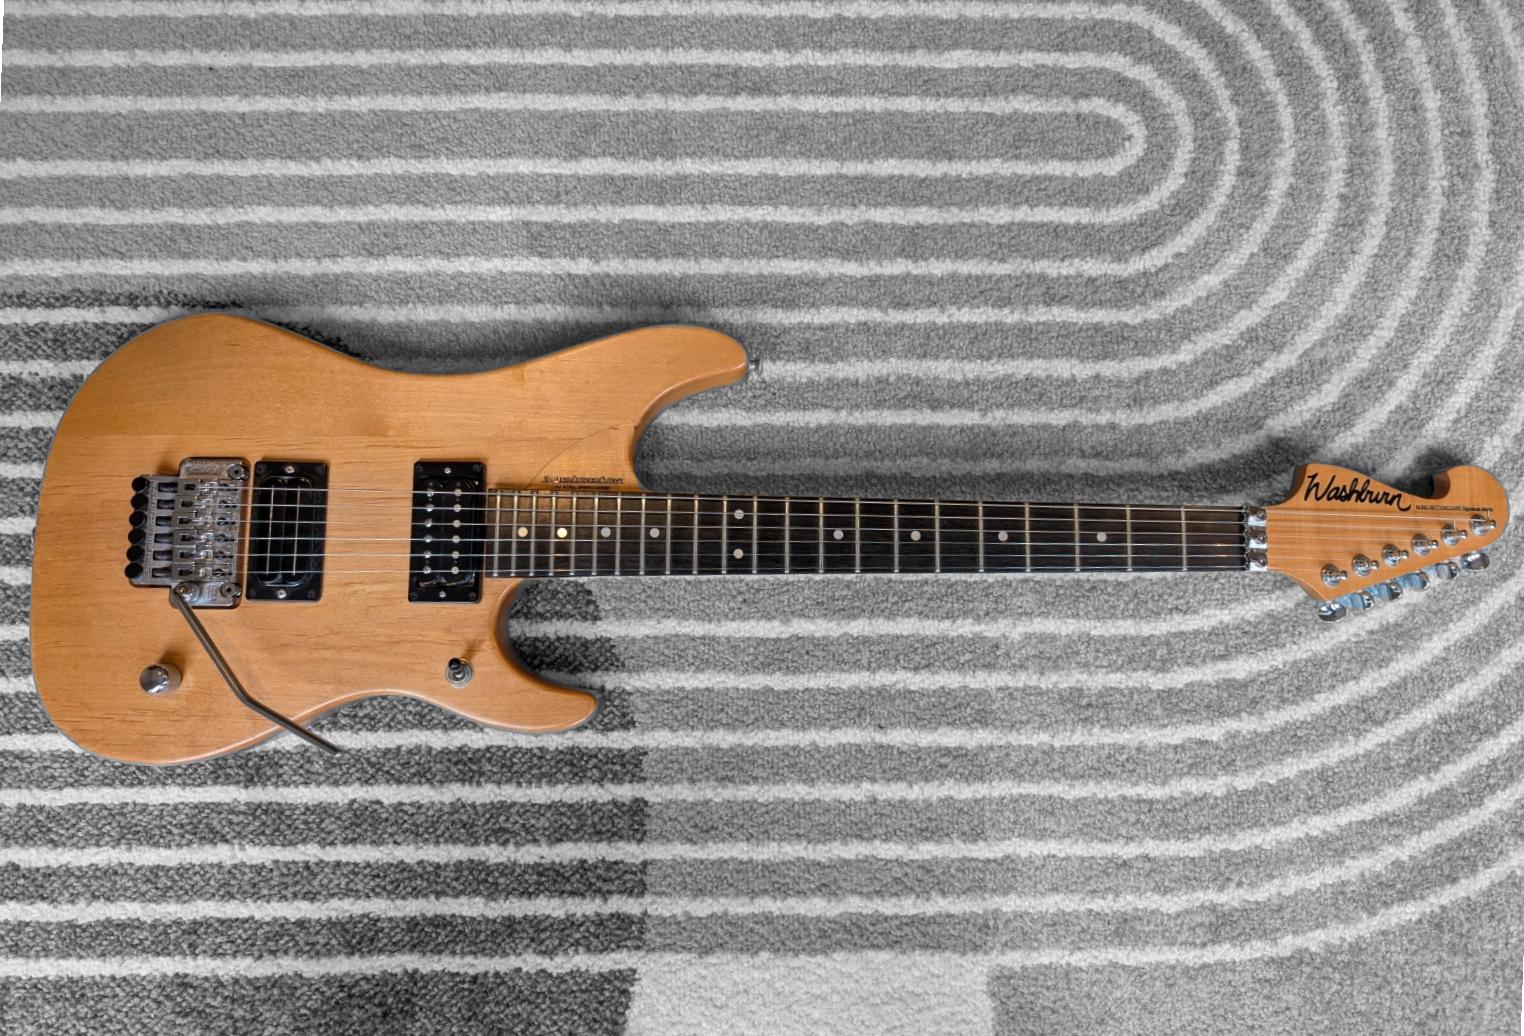
The Floyd Rose double locking Tremolo system is widely regarded as the first locking tremolo system when he first invented it in 1970’s. Floyd D. Rose invented this system in the early 1970’s, with the first prototype built around 1976. He refined it through additional prototypes in 1977 before receiving the key U.S. patent on October 23, 1979.
Floyd Rose passed away in early 2025 at age 77 so I’ll never get the chance to meet him. If I had gotten to meet him, I honestly don’t know whether I would hug him or strangle him! The tremolo system is absolutely brilliant when it’s all setup up and working correctly. You can abuse the whammy bar to your hearts content and it will stay in tune, but, whilst changing strings is a bit more complicated, if you ever want to change the gauge of the strings or drop tune the E string to D or lower, the balance of the entire system is thrown out and it can be a painful experience to balance it again.
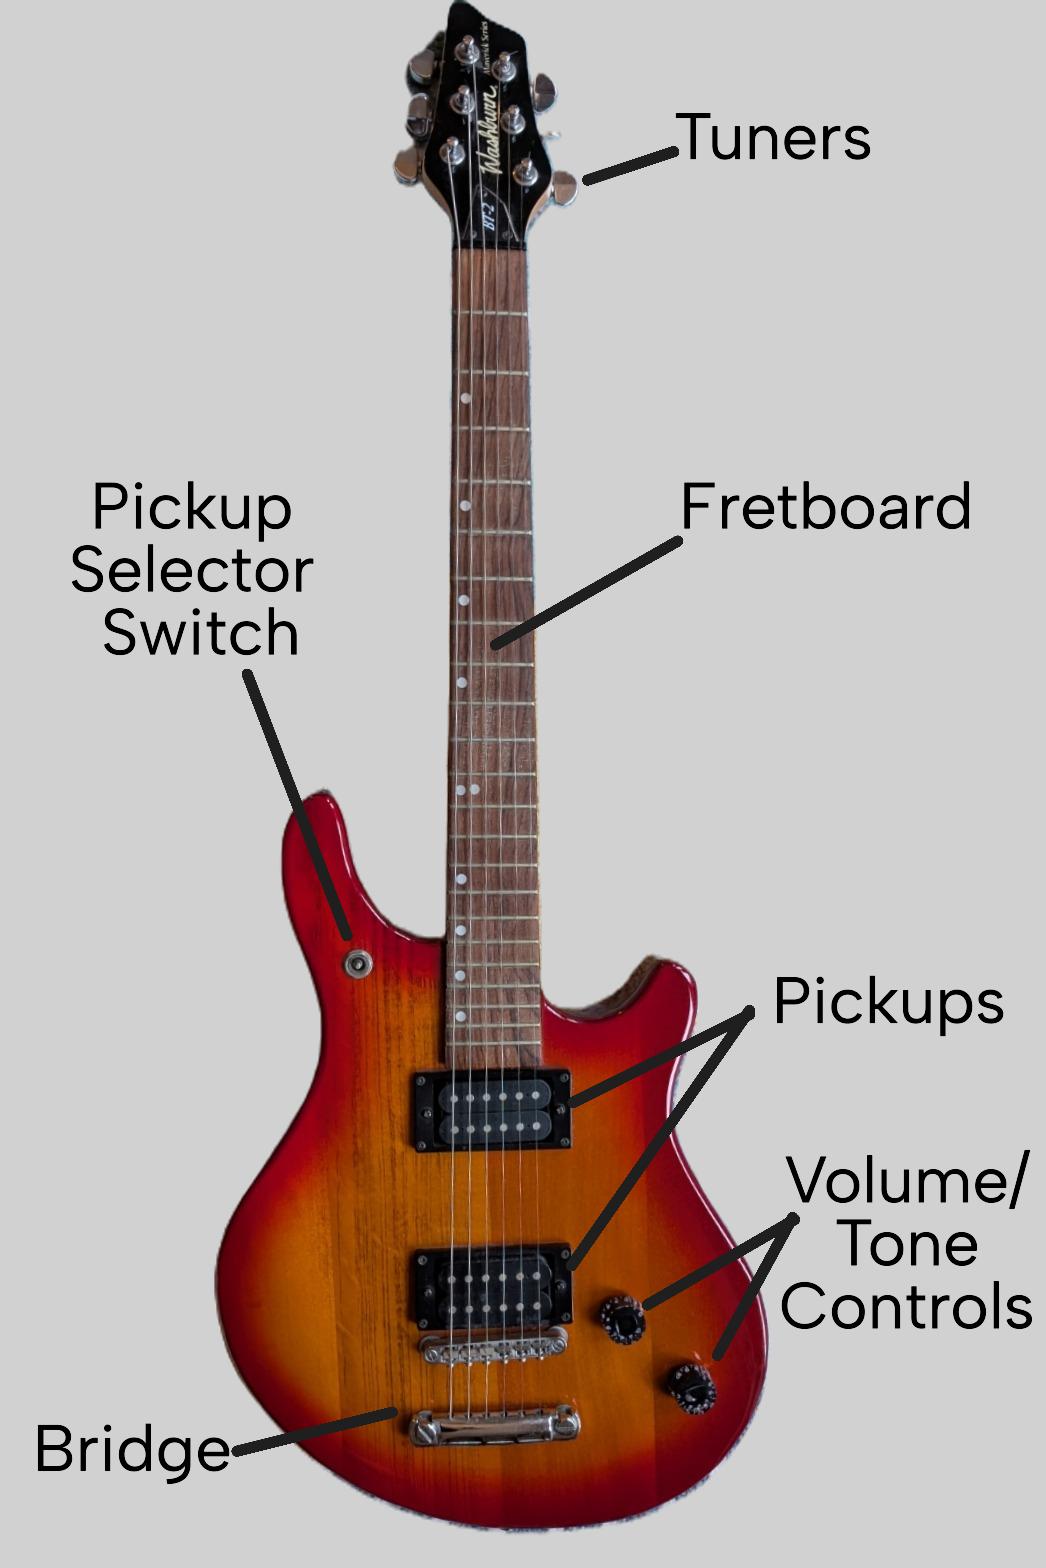
Anatomy of a Locking Tremolo System
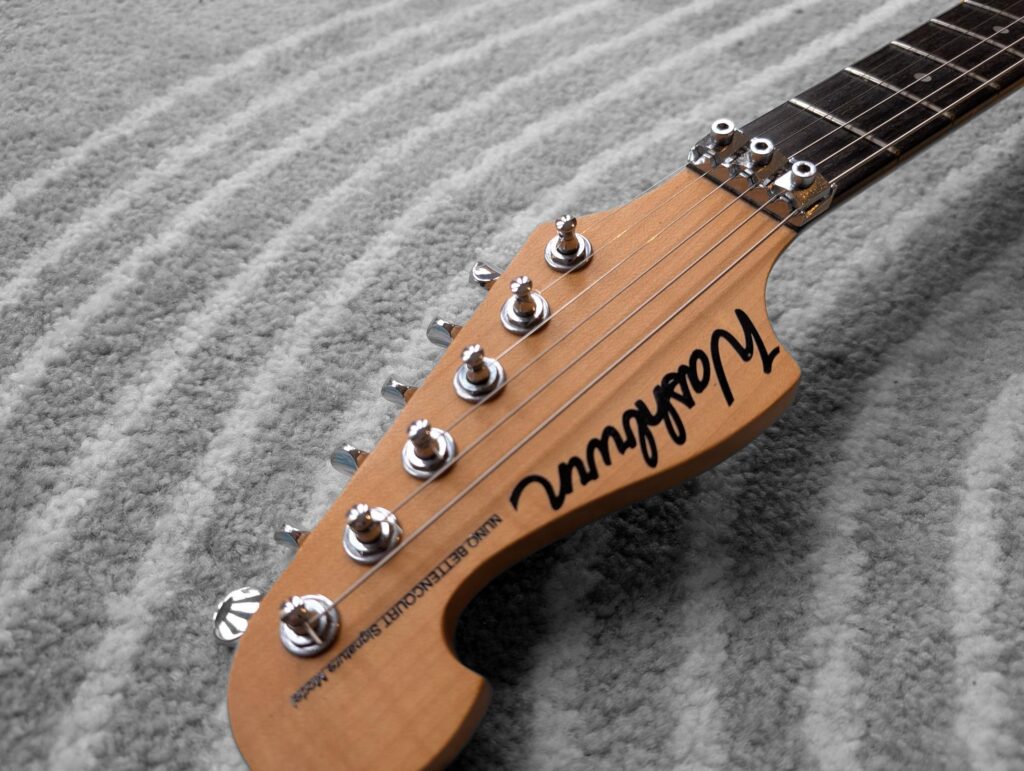
The locking tremolo consists of three parts. First there is the locking nuts at the top of the fretboard usually consisting of three Allen (hex) bolts which clamp the top of the strings before the tuners.
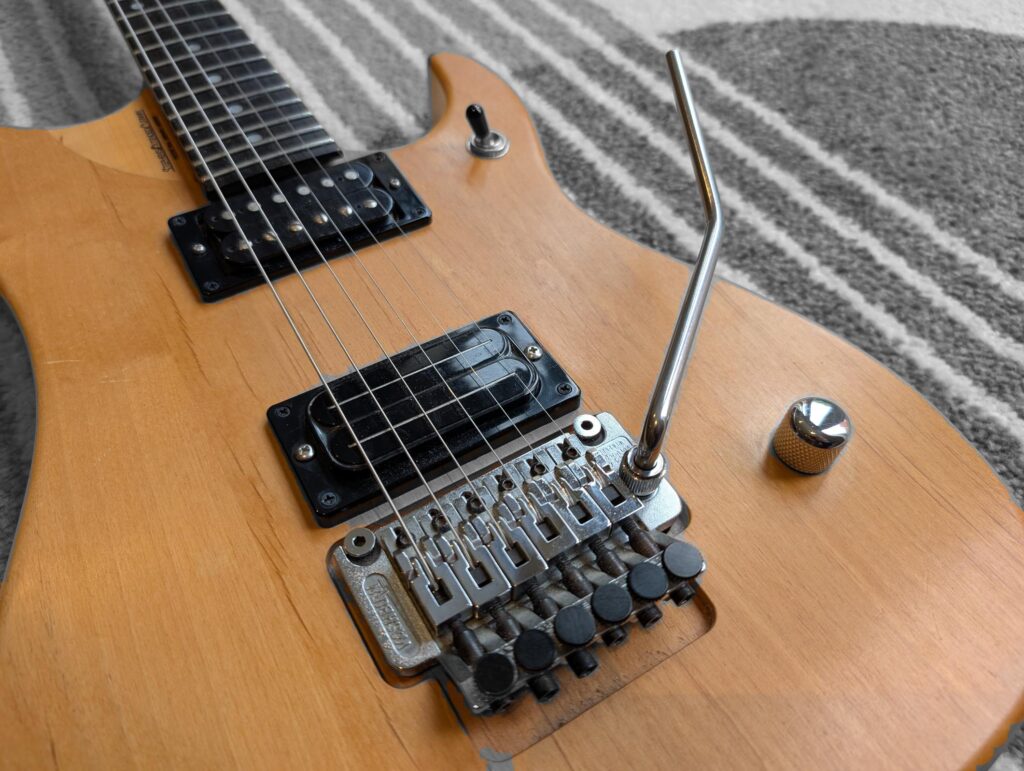
Next there is the bridge. The action and intonation can be adjusted here, this is where the ends of the string are clamped rather than threaded though like other bridges and also there are some fine tuners for each string.
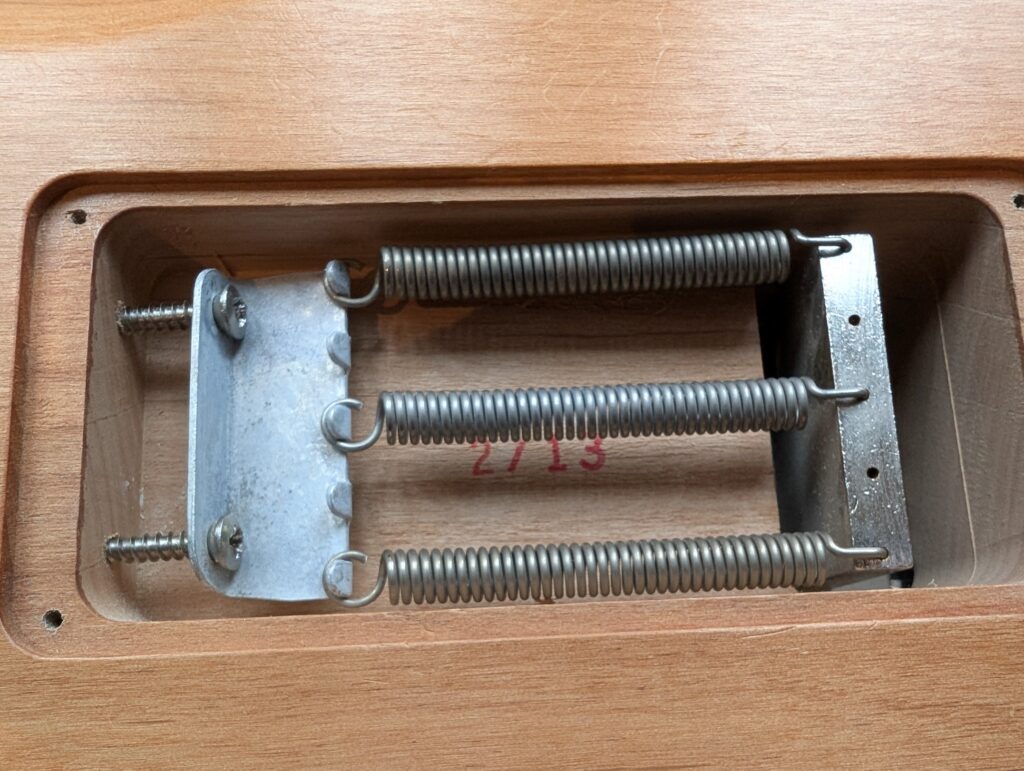
Finally in the back of the guitar you will find the springs which counterbalance the tension of strings. When the locking tremolo is set up and balanced, the bridge should be perfectly flat.
What You’ll Need
New set of strings.
String winder (optional but makes life easier).
Wire cutters.
3mm and 2.5mm hex keys (usually included with your guitar).
Tuner (clip-on, pedal, app – anything accurate).
Soft cloth and, if you want, fretboard cleaner/conditioner.
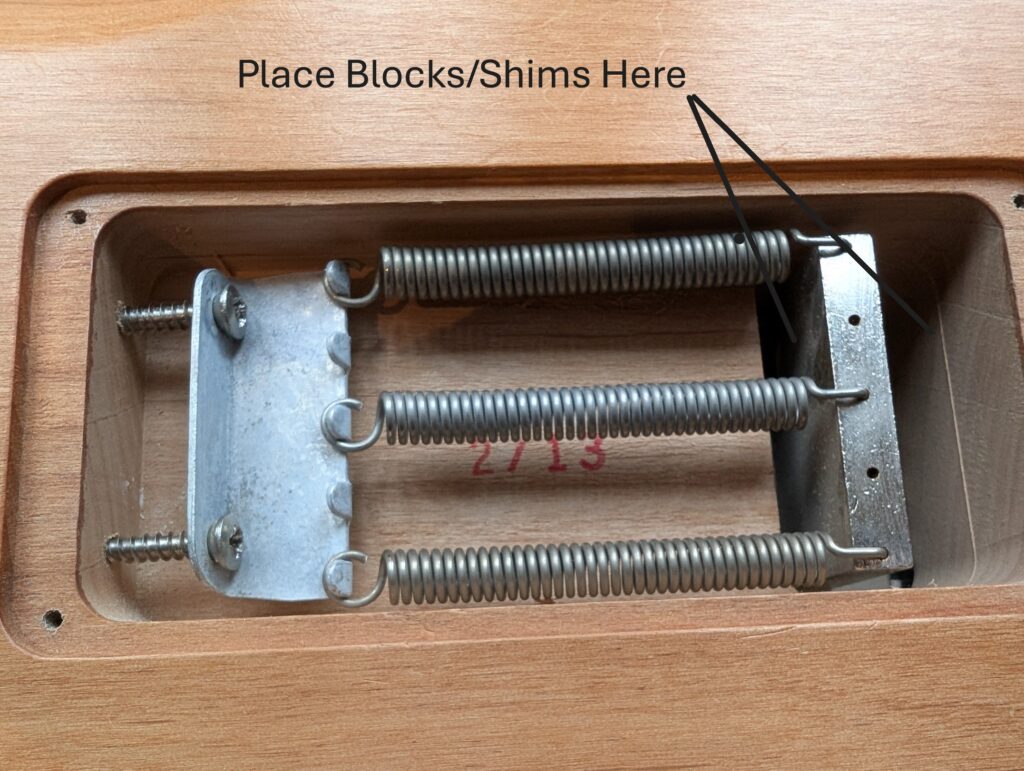
Step 1: Immobilise The Bridge
I have found that this makes it far easier to change the strings. Simply place an obstruction such as two bits of wood cut to size or stack it out with some plastic shims/packers either side of the tremolo block at the back of the guitar to stop it moving during the string change.
Step 2: Unlock the Nut and Loosen the Strings
Start by setting the fine tuners at the bridge to halfway — this gives wiggle room later for precise tuning. Then, use the correct hex key to loosen the locking nut clamps at the top of the neck. Now unwind each string slowly to release tension.
Step 3: Remove the Old Strings
Each string is clamped into the bridge block rather than threaded through like on a fixed bridge. Use your hex key to slightly loosen the saddle clamp screw for that string. The small metal block will release, and you can remove the string end from the saddle.
At this point you may want to apply fretboard cleaner & conditioner.
Cut off the ball end of the new strings and insert the freshly cut end into the saddle slot, tightening the clamp screw securely — but don’t overtighten it (I did this once!) or you will strip the threads of the screw and then you’ll need a new saddle slot.
Step 4: Install and Tune the New String
Good stringing at the tuners is the key to tuning stability. A simple, reliable method:
Pull the string up to its tuner, all the strings should be on inner side of the guitar.
Wrap the string round once below the hole in the tuner peg.
Wrap the string round again above the hole in the tuner peg.
Stick the end of the string through the hole and pull tight. This locks the string in place and increases tuning stability.
Repeat for all six strings, working methodically (for example low E to high E).
Step 5: Tune & Lock
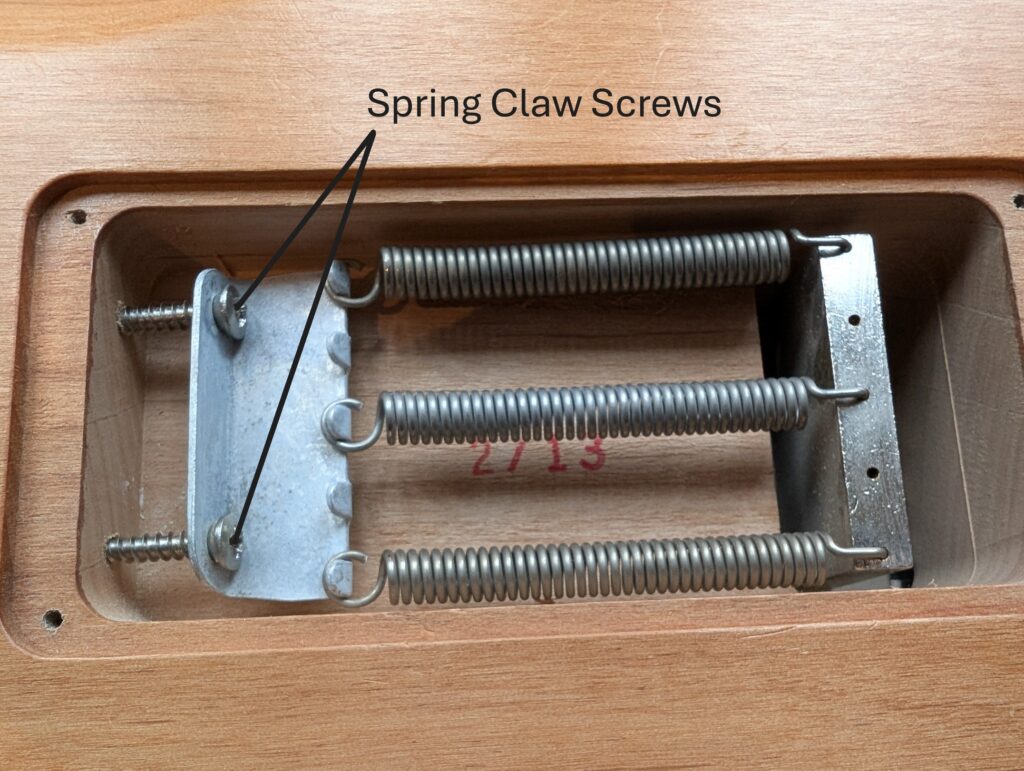
Tune each string in turn, once all strings are in tune, remove the blocks/shims/packers from the tremolo block. If you have changed the gauge of the strings or the tuning it is likely that the tremolo will no longer be flat and the guitar will be out of tune. If you have changed to the same gauge strings it is likely that everything should still be roughly in balance. In any case follow these steps if the plate is out of balance:
If it’s tilting forward , tighten the spring claw screws (turn clockwise) equally on the back of the guitar.
If the tremolo plate is titling backwards, loosen the spring claw screws (turn anti clockwise) equally on the back of the guitar.
You should find that as the plate levels, the guitar will become in tune again or not far off. Adjust the tuning now so that it is in tune again. If necessary, you may have to adjust the spring claws to level out the tremolo and retune again, but if you have blocked the tremolo during the change then you should have to do this fewer times!
Step 6: Lock it down
When everything feels stable and the tremolo returns to a neutral position, lock the nut clamps again. These should be tightened a little more than finger tight, do not over tighten.
Use the fine tuners at the bridge to bring each string into perfect tune.
Step 7: Stretch and Settle
Play some wide bends and light tremolo dips to ensure the strings are stretching evenly. Retune again using the fine adjusters. After 10–15 minutes of normal playing, tuning stability should lock in beautifully.
Final Thoughts
Changing strings on a locking tremolo might take a little longer, but once you’ve done it a few times, it becomes second nature. The payoff — a guitar that stays perfectly in tune even after wild dive-bombs — is well worth the effort.
I hope this guide is useful, if you have any ideas about subjects for beginners you would like to see me writing about, please leave a comment below or send me an email via the contacts page.
Changing electric guitar strings is simple once you have a clear routine. This post walks through the whole process, plus a few practical tips to keep the guitar playing and tuning well. This guide is for guitars without a locking tremolo system which are a bit different. Please see this post for a guide to locking tremolo systems.
What you need
Before starting, gather:
New set of electric guitar strings in your preferred gauge.
String winder (optional but makes life easier).
Wire cutters.
Tuner (clip‑on, pedal, app – anything accurate).
Soft cloth and, if you want, fretboard cleaner/conditioner.
Having everything to hand stops you leaving the guitar half‑done on the bench. Please see my recommended gear page for any of these items if you do not have them.
Step 1: Prepare and loosen the old strings
Start by placing the guitar on a stable surface, ideally on a table with a towel or mat and some support under the neck, usually a thick book or two will work just fine for this. Then:
Turn each tuner to slacken the strings until they have no real tension and flop loosely.
Once slack, either unwind them fully from the tuners or cut them around the 12th fret and remove both halves.
Be careful cutting – only cut once the strings are fully slack to avoid any sharp recoil.
Step 2: Remove and clean
With the strings off:
Pull the ball ends out of the bridge or tailpiece (through‑body on a Strat/Tele, through the tailpiece on a Tune-o-matic style, etc.).
Take a minute to wipe the fretboard, frets and body area that’s usually hidden by the strings.
If the fretboard is very dry or grimy, use a small amount of fretboard cleaner or conditioner.
Step 3: Fit the new strings at the bridge
Open your new string set and lay them out from thickest (low E) to thinnest (high e). Then:
Feed each string’s ball end through its correct hole in the bridge or tailpiece
Pull the string through until the ball seats firmly in place
Check they sit properly and are not snagged or half‑seated, especially on through‑body designs.
Step 4: Attach at the tuners
Good stringing at the tuners is the key to tuning stability. A simple, reliable method:
Pull the string up to its tuner, all the strings should be on inner side of the guitar.
Wrap the string round once below the hole in the tuner peg.
Wrap the string round again above the hole in the tuner peg.
Stick the end of the string through the hole and pull tight. This locks the string in place and increases tuning stability.
Step 5: Wind up to tension
Using your hand or a string winder:
Keep gentle tension on the string with your free hand while turning the tuner.
Make sure each new wrap coils neatly below the previous one, not crossing over itself.
Confirm the string is sitting correctly in the nut slot and over the bridge saddle.
Repeat for all six strings, working methodically (for example low E to high E).
Step 6: Stretch and tune
Fresh strings always go out of tune until they settle. To speed that up:
Bring each string roughly up to pitch with your tuner.
Gently stretch it by pulling it away from the fretboard around the middle (7th–12th frets), a few times along its length.
Re‑tune and repeat stretch/tune cycles until the pitch stabilises.
Do this for all strings; it makes the guitar far more stable when you start playing.
Step 7: Trim and final checks
Once everything holds pitch:
Use wire cutters to trim any excess string sticking out from the tuner posts, leaving a few millimetres if you like.
Run a final tuning check across all six strings.
Play some chords and bends to confirm tuning stability and that each string rings clearly.
If anything buzzes or sounds muted, check the string is properly seated in the nut and bridge, and that the wraps at the tuner are neat. if there is nothing obvious, please check my guitar setup post for further ideas.
Final Thoughts
With this routine, changing strings becomes a quick, regular part of maintaining your guitar. Over time you’ll get faster, and you can refine details (like string gauge or brand) to suit your own feel and tone.
I hope this guide is useful, if you have any ideas about subjects for beginners you would like to see me writing about, please leave a comment below or send me an email via the contacts page.
When you first get your brand new guitar, it is unlikely to be set up to play well unless you get it from a reputable guitar shop which should set it up for you before handing it over. While it may be tempting to get an expert to tweak your brand new pride and joy, taking the time to learn how to set up a guitar as you would like it, or diagnose and fix any little niggling issues is time well spent and rewarding.
Whilst much of the arrangement of an electric guitar are fixed at design by the manufacturer, considerable scope for adjustment remains. These adjustments may seem daunting to the beginner, but with a little knowledge and experimentation you can be well on your way to being able to being your own guitar tech. You will be surprised at how much improvement in playability of a guitar can be achieved from a properly set up guitar, and how easy it is to keep it in top playing shape despite any changes in temperature, humidity, handling and maybe a change in string gauges.
Before we get into the nitty gritty a few notes to bear in mind:
Whilst all guitars are fundamentally similar, any given brand or model will have its own nuances. This guide should be considered a supplemental addition to any manufacturer information. I refer to metric based setup parameters, but I’ll put inches in brackets afterwards. If your guitar manufacturer specifies different parameters, these should be adhered to instead.
Always make adjustments at room temperature and keep the instrument at the correct tuning throughout the setup process.
Setup starts with the truss rod, followed by the bridge, the intonation and finally the pickup height, find a flat surface to work on with good lighting, lay down a towel to prevent scuffing/scratching, a couple of thick books should support the neck to stop any unintended re-tunes whilst laying the guitar flat! Allow about an hour for the first setup, any re-visits should go a bit quicker.
For best results any measurements should be taken in the upright position to avoid any influence from gravity.
Any setup specifications I have provided are really just a starting point. For example, some players prefer a flatter neck and will try to set it as flat as possible without any fret buzz, others may want extremely low action at a specific part of the neck and might use a combination of setups to achieve that goal. Once you become more familiar with setting up the guitar, feel free to experiment, always make small adjustments at a time to achieve the setup you desire.
Locking tremolos are out of the scope of this particular guide. I have written about how to change strings and set up a locking tremolo here. If you have a locking tremolo on your guitar I suggest you read this and then come back to this guide and pick it up again at Step 1, nearing in mind the differences for your guitar.
Changing Strings
The ideal time to undertake a complete setup is following the installation of a new set of strings, please refer to this guide for a tutorial in changing strings. If you have a locking tremolo system on your guitar, try this guide instead.
Tools
Usually the correct allen(hex) keys should be supplied with your guitar for truss rod, intonation and string clamps. depending on the model of your guitar a flat or phillips head screwdriver may be required for some adjustments. In addition to these a feeler gauge, capo and guitar tuner is also required. If your short of any of these items please look at the recommended kit page where a decent guitar toolkit is highlighted.
Step 1: The Truss Rod
No other adjustment strikes fear into the heart of would be guitar tinkerers than the truss rod, this adjustment is thought to be able to destroy your guitar with one ill thought out tweak!
Whilst it is certainly true that you can damage your guitar, taking the time to understand the purpose of the truss rod and making small adjustments, with purpose, should help alleviate any anxiety.
Imagine the guitar lying flat on a surface, the strings act on the guitar neck to create a slight upward bow, this is desirable within a certain range but can cause playability issues if it is excessive.
To counteract the action of the strings on the guitar, manufacturers install the truss rod inside the neck with a nut at one end. Tightening the bolt i.e. turning it clockwise makes the neck more resistant to the action of the strings and flattens the neck. Loosening the bolt on the truss rod i.e. turning the bolt counter clockwise has the opposite effect, allowing the strings to bow the neck more. Only make small adjustments to the truss rod should be made at a time!
It’s worth noting that the truss rod adjustment point is most commonly located at the top of the neck, sometimes covered by a piece of plastic near the nut of the guitar or, more annoyingly, at the other end where the neck meets the body. In this case you have to loosen the strings, sometimes you may even have to take out the pickup near the neck to get to the truss rod any time you need to adjust it!
Since the neck is made of wood, it won’t immediately be obvious that anything has changed if you make an adjustment to the truss rod tension. It is advisable to wait between adjustments; I generally allow 10-15 minutes between adjustments allowing things to settle before deciding if a further tweak is needed.
My preferred way to ascertain if adjustment is needed is to measure! The tools you need for this are:
A Capo
A Feeler Gauge
The technique is as follows:
Attach the capo to the 1st fret,
Depress the highest fret of the lower E string (the thickest one!).
Find the midway fret between the capo and your finger on the highest fret (usually the 8th fret).
Measure the clearance between the midway fret and the string.
A good starting gap to aim for is 0.25mm (0.010”).
If the string height is more than this this, the strings are winning, and the truss rod should be tightened (turn the nut clockwise).
If the string height is less than this, the neck is winning, and the truss rod should be loosened (turn the truss rod nut counter clockwise).
Make small adjustments, no more than a quarter turn at a time. Leave for 15 minutes, check the tuning and repeat from step 5 again until you are satisfied.
Truss rod adjustments may require some force but if you sense abnormal resistance, take it to a professional for assessment.
Step 2: Action
Action refers to the height of the string above the fretboard. The higher the action (higher the string is away from the fretboard, the harder it is to play as you require more hand strength to fret the note on any particular string. Conversely, the lower the action (the closer the string is to the fretboard), the more likely the instrument is to suffer from fret buzz, that annoying buzzing sound when a note is fretted, but due to the curvature of the neck, the string may catch on a fret higher up the fretboard.
Setting up the action is a compromise or balance of getting the string height just right so that the string is as low as possible for playability, but not so low as to cause fret buzz. The action is generally altered at the bridge. There are a few different styles of bridge that offer different arrangements for increasing /decreasing the action height.
Most commonly, the action is adjusted by two saddle screws at either side of the bridge.
To check the action, measure the height of the string height with a ruler balanced on the fret itself at the 17th fret and adjust the string height to about 2mm (5/64″) above the fretboard using the bridge adjustments particular to your type of guitar. Work in small increments of 1/4 -1/2 turns. A clockwise turn will lower the height and a counter clockwise turn will raise the height of the strings. Make equal turns on both sides of the bridge to keep it roughly level although the thinner strings don’t move as much so the action can be set slightly lower on that side without running into buzzing issues.
The action of the guitar can be set to a wide range of preferences, some guitarists prefer a low action so they can perform lighting quick solos and may even tolerate a certain amount of fret buzz to achieve it, others prefer a higher action. Use the height provided as a start and experiment to see which you prefer.
Now is a good time to check the height of the strings at the nut of the guitar, this can be a good test as, even if set up correctly, if there is a problem with the nut, there may be issues. the height of the string at the first fret should be above 0.5mm (0.020″), if it isn’t, this may indicate wear at the nut and it may require replacement, which is beyond the scope of this guide. A quick dirty temporary fix would be to pack the offending string slot by placing a shim under the string, a sturdy piece of card might work.
Step 3: Intonation
Intonation, simply put, is how in tune your guitar is along the fretboard. for example, if you were to play an open low E string (thickest string) and then play 12th fret of the same E string you are playing the note E an octave higher. Both notes should be an E, and if they are not there is an issue with intonation.
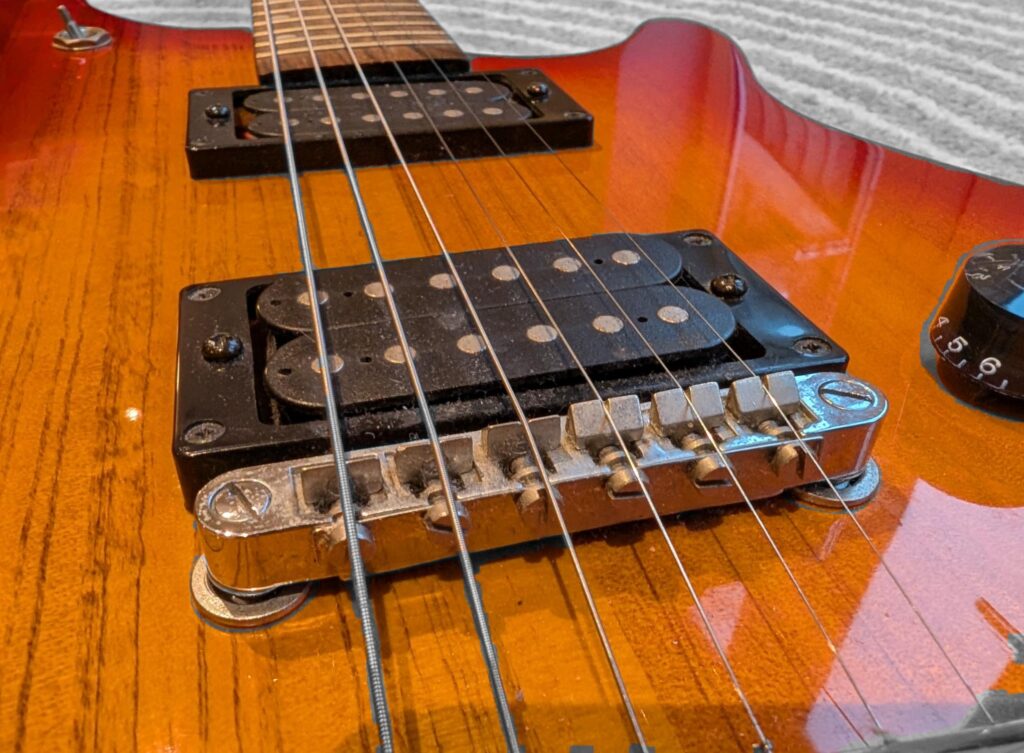
As can be seen in the photo above, there is a screw associated with each string, each type of bridge usually has a similar arrangement. Each screw can be adjusted to lengthen or shorten the playable length of the string.
The use of a tuner is recommended for this part of the setup, simply turn on the tuner, and start on the lowest string. Play an open note and then fret the 12th note of the same string and pluck. Note the difference between the notes. If the fretted note is sharp (higher), tighten the screw which lengthens the string, if the note is flat (lower) loosen the screw which shortens the string. After adjustment try the test again and adjust until the open note and fretted note are the same. Repeat this sequence for each string until all your strings are correctly intonated. It is common for all the strings to be at different lengths when correctly intonated. I’ve no idea why this is!
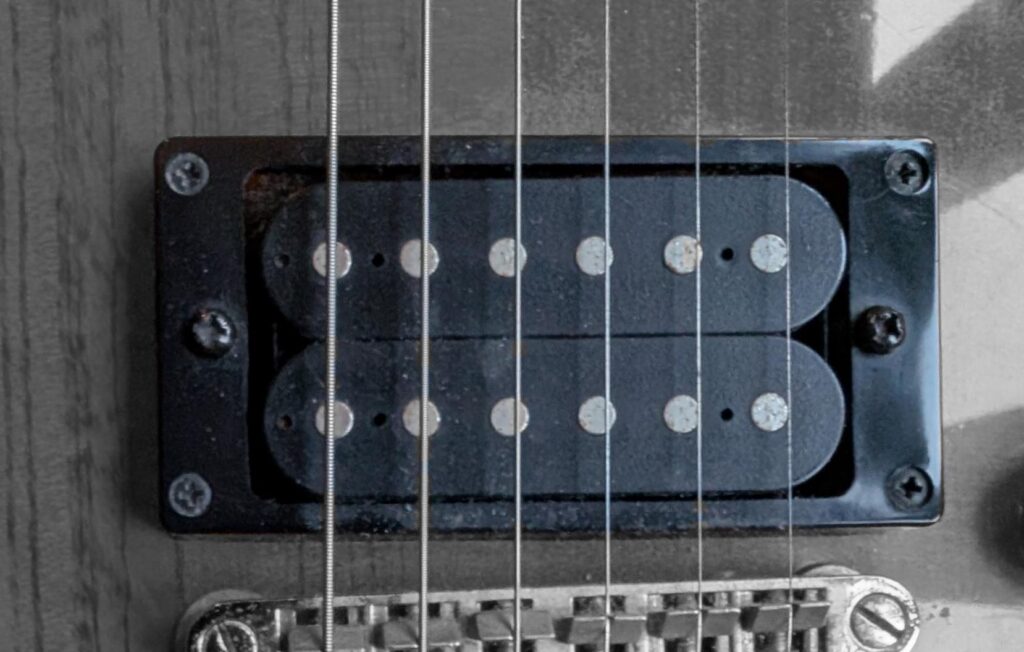
Step 4: Adjust Pickup Height
A guitar pickup works via the metal strings vibrating within a magnetic field produced by the pickups on the guitar, this produces a small alternating electric current, which is sent out via your guitar lead to an amplifier, which then replicates the sound of your guitar string being played.
The pickup height can be adjusted, usually via the two screws on either side. turning the screw clockwise will raise the height of the pickup, turning it counter clockwise will lower the height of the pickup.
A good starting point is for a clearance of 1.5mm (1/16″) between the pickup and the high E string (thinnest string) and 2mm (still generally rounded to 1/16″) at the low E (thickest) string. Generally speaking, the closer the pickup to the string, the louder it will be, the lower it is, the quieter and more mellow it will sound.
If your guitar has more than one pickup, try and get them to the same height and then adjust as necessary so they are about the same volume.
Final Thoughts
With this final adjustment, the setup is complete. Now all you have to do is learn to play the thing, which is a whole other journey!
I hope this guide is useful, if you have any ideas about subjects for beginners you would like to see me writing about, please leave a comment below or send me an email via the contacts page.